


Web3 provides the internet with an ownership layer – a means to securely transact with a new class of digital goods that can be bought, sold, gifted and held just like commercial physical objects. We’re still in the early stages of shaping the characteristics of this new property type, and currently, most blockchain-backed title deeds (aka NFTs) reference a humble jpeg as the object of ownership, flat image files that non-owners can copy and save with a simple right-click. But as the protocols that define web3 become baked into our computing infrastructure, expect to see a Cambrian explosion of new, increasingly complex digital property types that will continue to rival physical objects as stores of value.
When I first saw an NBA TopShot digital trading card in 2021 it reminded me of something out of a William Gibson novel, the digital ice that Neuromancer’s Case might encounter after jacking into his Ono-Sendai cyberspace deck. These things were otherworldly cool! Dapper Labs, the company responsible for this new breed of collectible, built them using Cinema 4D and the 3D game construction engine Unity, no doubt anticipating a time when owners would show off their property in the metaverse. At present, these interactive game objects are rendered as linear video loops for display on the web, somewhat diminishing their allure, but not enough to prevent collectors from pushing TopShot sales across the billion-dollar threshold in May 2022. Of course, it was the nugget of sports media at the centre of these objects that drove fervent adoption (and rampant speculation); the extraordinary packaging just served to elevate the entire experience.
Our Requirements
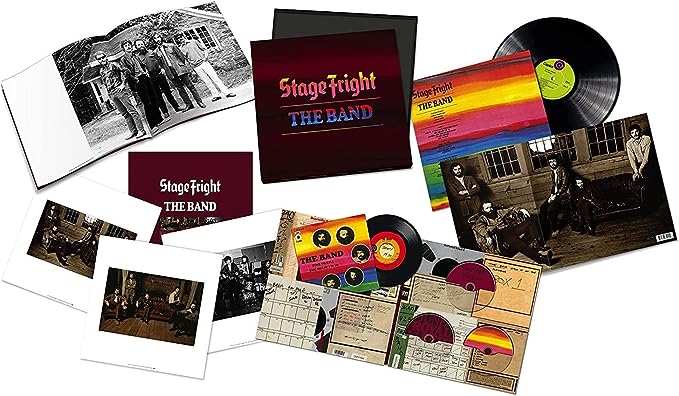
Before we launched our web3 music strategy with community-driven social tokens, we spent time envisioning what we broadly wanted to see in our token offerings and what kind of technical infrastructure would be required to grow and support a robust digital property ecosystem over time. We knew we preferred dimensional 3D objects over 2D ones, but they’d have to render natively in the browser and be interactive from the get-go. In some cases, we’d want to embed rich media like audio and video, but with an option to restrict access to token owners to prevent unauthorized copying. We also wanted the ability to imbue our property with rarity traits, and for these unique asset bundles to be dynamic and updatable so that they could morph and change over time. Following the web3 ethos, our objects would be stored in a redundant, decentralized fashion, not tied to a single centralized point of failure or exploitation. And most importantly, the fanciest of these goods had to appeal to collectors on a visceral level, to convey the same sort of magical object-ness that Dapper’s geometric basketball moments so successfully communicated to millions of fans. Or, to put it in more familiar music industry terms, the same sort of joy that attends the opening of a coveted box set from a musician you love, putting on the first song, and losing yourself in the liner notes and photographs.
3D Groundwork
Our first step was to find a 3D artist who could work with us to define both a strong artistic vision and a solid technical footing for building out our digital property packages. I began scouring portfolio sites and freelance marketplaces, reviewing the work of practitioners who were mostly WebGL and Three.js specialists, but finding someone with the right combination of talents was proving difficult, until I ran across Jonathan Wszalek, a web 3D veteran who, like me, had spent years developing with Flash before turning to HTML 5 and the Canvas. Some of Jonathan’s more impressive demos were built with only HTML, CSS and vanilla JS and did not depend on bulky external JavaScript libraries, an approach appealingly aligned with web3’s open protocol and future-proof ethos. Jonathan also possesses a refined artistic sensibility; his handling of shadows and light and subtle texture and movements placed him in a class above some of the more workaday efforts I had been looking at elsewhere. Luckily for us, his schedule was opening up and he joined Adam, Anton and me in our quest to crack the dynamic digital property code.
Pipeline and Storage Considerations
While Jonathan worked on developing some proof-of-concept 3D tests, Adam and I turned to the question of where our digital property would live and how we would manage and update it. Obviously, a storage solution like Amazon’s S3 would have been the simplest answer, but we were committed to going the decentralized, peer-to-peer route, which meant evaluating solutions like Arweave, Filecoin and IPFS. Of these, it was the IPFS solution from Pinata that seemed to check all boxes. We didn’t want the management overhead of running an IPFS storage node ourselves, so outsourcing to a pinning service made sense. We liked that Pinata offered a dedicated gateway, a basic API for automating the content pinning process, and a feature called “submarining” that would let us restrict access to content we had pinned - useful for keeping copyrighted media from circulating freely.
Graphic Design
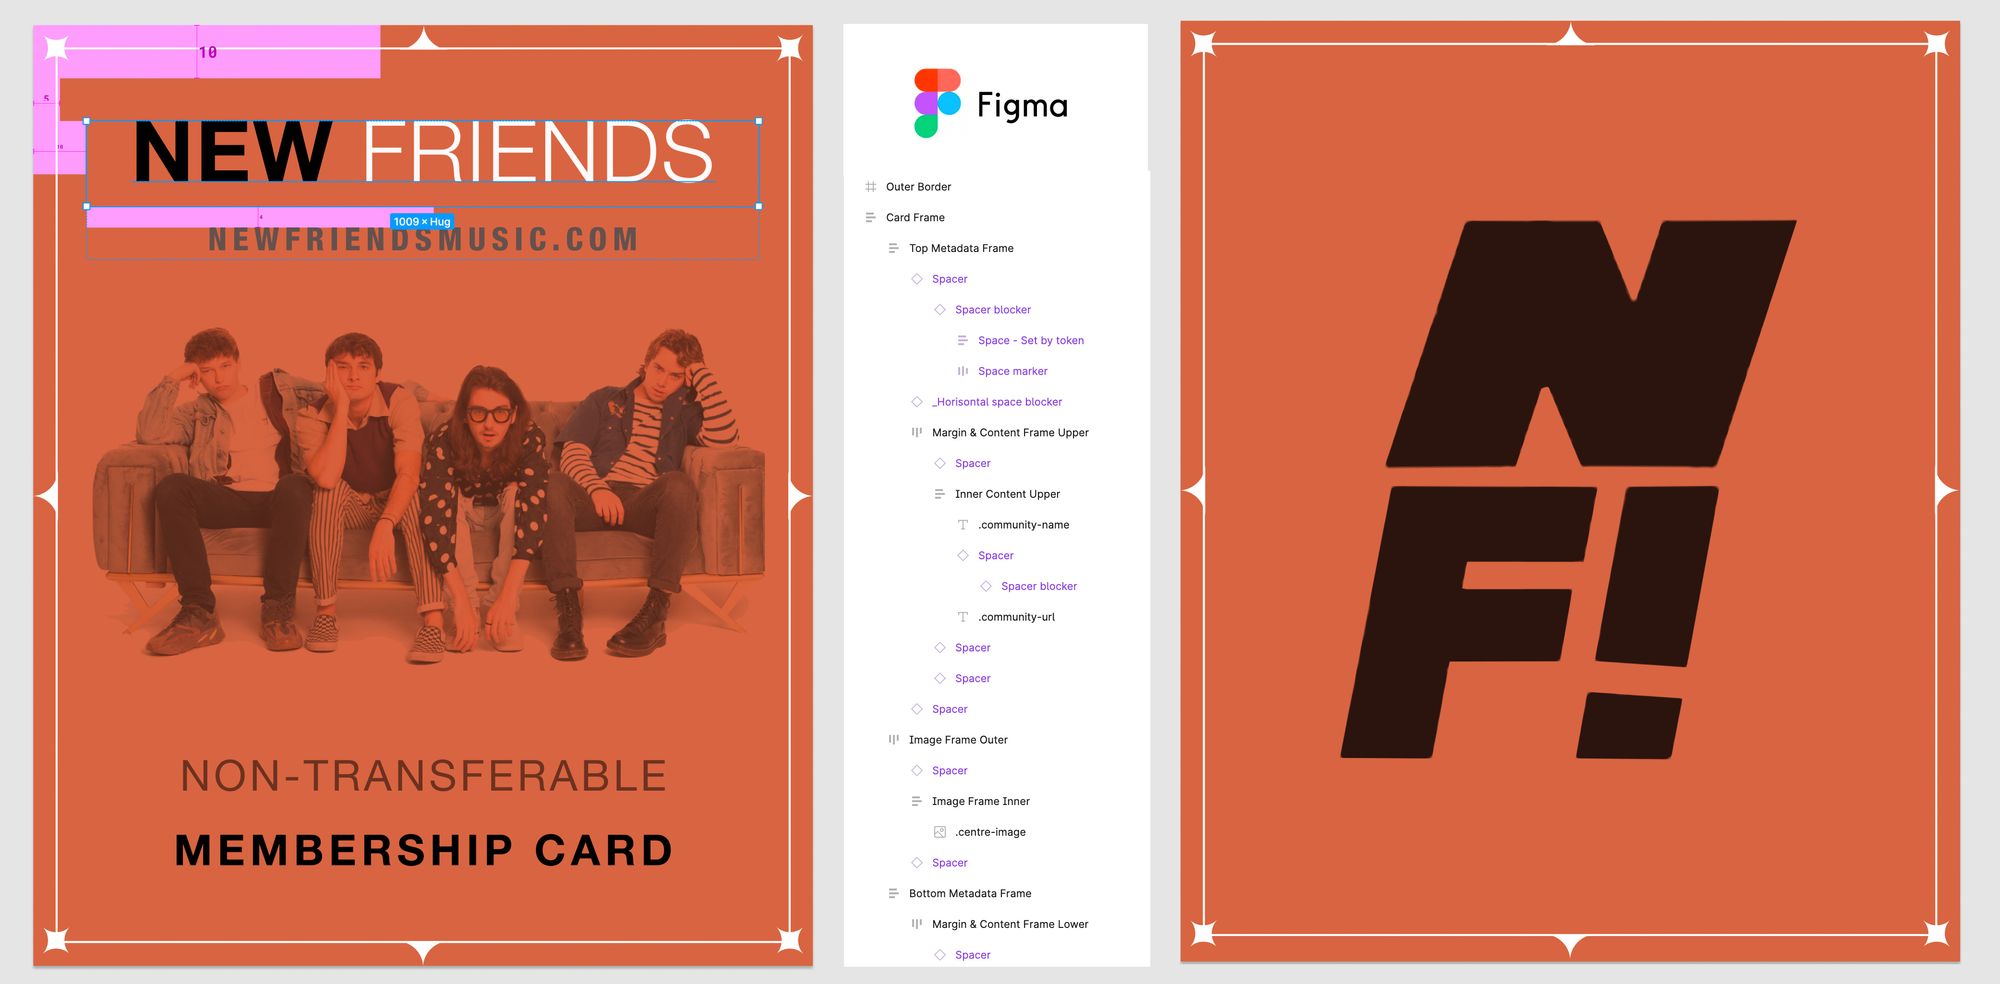
I had been using Figma for user interface design and loved how it narrowed the gap between designers and developers, so we decided to also use it for the 2D layout of our property faces. Among the simpler designs were the two-sided rectangular membership cards and two-sided attendance tokens with the perforated edge described in earlier posts. For these two cases, we’d start by designing and exporting static image files from Figma at the designated size, but progress to rendering the designs out as HTML so that certain elements (like serial numbers and dates) could be dynamically set for each user’s individual mint. Figma’s support for design tokens – application variables that hold style values like colours and text sizes and are represented throughout code from this single source of truth – was intriguing to us, as it would allow source changes to automatically ripple through a live build with a code push. Ideally, we hoped to develop a set of skins that could be reused across different projects and allow for the easy customization and updating of type sizes, colour palettes and image elements, without developer involvement.
Given our future ambitions, we spent time establishing a structured design approach that took advantage of Figma’s powerful Auto-Layout feature which mimics the CSS Flexbox model and gives you browser-type responsive behaviour right inside the design environment. Carefully defining the specs for each element, including negative layout space, would ensure that when it came time to render our designs as code maximum fidelity to our mockups would be preserved and the required DOM structure could largely be inferred from Figma’s nested layer stack. For the moment, however, we output our designs as static PNGs and passed them to Jonathan to incorporate into his initial builds.
The 3D Environment
Jonathan committed his first pass at our 3D environment, which consisted of a series of nested HTML DIVs, some CSS and some JavaScript. The outer DIV was a container called Scene-3D, followed by a shadow element, then the 3D object itself, then the sides of that object, and lastly the background plane. Next, styles, parameters, attributes and hooks were added to each of these DIVs as required to set the environment’s dimensions, imagery and behaviours. Finally, two controllers were added that allowed the user to rotate the object either rightwards or leftwards. If no mouse or touch events were detected for 3 seconds, the object would begin to slowly rotate in a clockwise direction, to provide some dynamism to the scene.
After playing with an initial demo, we decided to add the ability to “zoom up” an object face by double-clicking on it which would allow the user to see the content face at the maximum size afforded by the display. We added two chevron arrows in this heads-up display (HUD) mode to cycle through the faces. Double-clicking again would return the object to its default position. There was some tricky math involved in successfully toggling between these two states, relating to issues between our use of both fixed and relative measurement units. It also took some considerable work to get things working on mobile devices, where touch events were substituted for point-and-click mouse actions. After a series of iterative builds, troubleshooting and debugging sessions, we managed to iron out the issues. You can play with a sample HTML membership card below.
Adding Rich Media
These static membership cards are digital property at its most simple – no dynamic customization of text or image elements at this point, and no associated media files. But while every membership asset bundle currently looked exactly the same, each copy would live at a unique content address on the InterPlanetary File System and be tied to a unique wallet address belonging to the token owner. A number of additional bits of infrastructure would need to be built for that to happen – a pipeline to Pinata’s pinning service and an interface with the Flow blockchain among them – and those things will be the subject of a follow-up blog post.
While we were still in 3D build mode we wanted to take a pass at a second, slightly more complex object. While membership tokens were business-card-shaped right-angled rectangles, the shape of our attendance tokens echoed paper tickets that had been torn off from a large roll. Unlike membership cards, attendance tokens would be extensible, allowing for the addition of an embedded media file at a later date. I mocked up a design in Figma, using an upcoming New Friends live event as the model. The band had hired a videographer to shoot and edit a highlight reel of their show, and we decided to add an optional play button to the token’s back face – pressing the button would trigger playback of the video, provided you were the token owner. Adam wrote some code to perform this query against the Flow blockchain, and he added a custom handler to either present the video inside of the JW Player or else show a “Sorry, only token holders are permitted to view this content” message.
Pushing Boundaries
We now had a token-gating mechanism inside of our asset bundle and could extend and adapt it to grant or deny access to whatever exclusive content we wanted, meaning lots of potential future use cases were now open to us, an exciting prospect. Inspired by the Top Shot cubes, with their dynamic faces and inner and outer dimensions, we began sketching six-sided objects with a variety of content.
Rarity Traits & Special Effects
Looking ahead to where we imagine taking things, the addition of unique elements such as glow effects, geometric transitions, animated surface elements and the like would give our property rarity traits akin to what one finds with a PFP jpeg project like the Bored Ape Yacht Club. Often used as a proxy for market value, combinations of traits are typically distributed across a set of tokens, their frequency helping to determine how rare or valuable a given token is.